Build WordPress Environment on Azure on Oracle Linux
WordPress needs no introduction. Because 42% of all websites on the entire Internet currently use WordPress as their content management…
WordPress needs no introduction. Because 42% of all websites on the entire Internet currently use WordPress as their content management system. This number is 36% for top 1 million websites, 20% for top 100K websites, and 14% for top 10K websites respectively (as of writing this Blog in July 2021).
WordPress can be self hosted on your own hosting environment, or you can use a web hosting service like , or among many other hosting providers. This Blog Post would however talk about how to host WordPress on Microsoft Azure Virtual Machine using Oracle Linux 8.0.
I assume that you have an active Microsoft Azure Subscription available with ability to create Virtual Machines and you are familiar with Linux. Also PowerShell for Azure is installed on your workstation.
Login to Microsoft Azure using the following command. You will be prompted to authenticate yourself to login into Azure Portal
We will create a Resource Group called WordPress in the US West Region for the purpose of this blog. You can use an existing resource group or choose the region as you deem appropriate.
Once you have created the resource group (the command would return Provisioning Succeeded), we would proceed to create the virtual machine using the following SKU.
az vm create --name azvmwordpress --resource-group WordPress --image "Oracle:Oracle-Linux:ol8_2-gen2:8.2.13" --admin-username "wpadmin" --admin-password "<Enter a unique password here>" --location westus --nsg-rule "SSH" --public-ip-address-allocation "static"
This command would return the deployment details including the Public IP Address. You will need that IP address to login into the server using SSH. Once the command is completed successfully, run the following command to open required ports.
I highly recommend using the AZ PowerShell command or tools like Terraform or Ansible to create deployments on Azure. Once the command has run successfully, you should be able to see the deployment on the Azure Virtual Machine Blade
Login into the Virtual Machine using the following command
Enter your password when prompted.
Now let’s setup “root” password for the server. Make sure you use a password that is difficult to guess and around 14–16 characters long with alphanumeric and special characters.
sudo passwd
Now lets login into the root using the following command
When deploying a new Linux Environment, it is important to upgrade the OS with the latest patches, firmware updates and other functionality.
You might want to go and grab a coffee as this might take a couple of minutes to run the upgrade.
Once the server is upgraded and patched with the latest updates, let’s install the latest version of PHP and all the required components to run WordPress. The minimum version of PHP required for WordPress is 7.4, so we will ensure that we are using the required version to install WordPress. Lets run the following command to check if the PHP 7.4 module is available.
If it returns multiple versions of PHP and 7.4 is not a default version (check under stream column against what version [d] is marked]
Let’s enable PHP 7.4 by running the following command
Now let’s install PHP and its required modules.
There are important changes you need to make to php.ini to ensure that WordPress runs smoothly and you are able to use Themes and Plugins as well as upload rich content like graphics, videos, etc.
And make the following changes
max_execution_time = 90 memory_limit = 256M upload_max_filesize = 64M max_file_uploads = 40
Now lets make modifications to Apache Web Server Configuration File
sudo vi /etc/httpd/conf/httpd.conf
Under <Directory “/var/www/html”>, change AllowOverride to All
Start the Apache Web Server
systemctl enable httpd
Now, we need to make firewall changes to ensure that the system can accept requests
firewall-cmd --permanent --zone=public --add-service=http
firewall-cmd --permanent --zone=public --add-service=https
Installing MySQL
There are multiple options to install mysql on Linux Environment. You can either install MySql from Oracle Linux 8 Application Stream or download it from mysql.com which is the method I prefer. Let’s download MySQL to a tmp location and install it from there.
Extract MySQL using the following command.
Install MySQL on the server
dnf localinstall mysql-community-client-8.0.26-1.el8.x86_64.rpm mysql-community-client-debuginfo-8.0.26-1.el8.x86_64.rpm mysql-community-client-plugins-8.0.26-1.el8.x86_64.rpm mysql-community-client-plugins-debuginfo-8.0.26-1.el8.x86_64.rpm mysql-community-common-8.0.26-1.el8.x86_64.rpm mysql-community-debuginfo-8.0.26-1.el8.x86_64.rpm mysql-community-debugsource-8.0.26-1.el8.x86_64.rpm mysql-community-devel-8.0.26-1.el8.x86_64.rpm mysql-community-libs-8.0.26-1.el8.x86_64.rpm mysql-community-libs-debuginfo-8.0.26-1.el8.x86_64.rpm mysql-community-server-8.0.26-1.el8.x86_64.rpm mysql-community-server-debug-8.0.26-1.el8.x86_64.rpm mysql-community-server-debug-debuginfo-8.0.26-1.el8.x86_64.rpm mysql-community-server-debuginfo-8.0.26-1.el8.x86_64.rpm mysql-community-test-8.0.26-1.el8.x86_64.rpm mysql-community-test-debuginfo-8.0.26-1.el8.x86_64.rpm
Start and Enable MySQL Services
We would need the default root password for MySQL. Use the following command to retrieve the password.
Run the following command to secure your mysql installation.
mysql_secure_installation
Once the MySQL installation is completed and installed, lets create a wordpress database using the following commands
Installing WordPress Application
Navigate to the /tmp directory
Download WordPress
curl https://wordpress.org/latest.tar.gz --output wordpress.tar.gz
Copy WordPress to default root directory of Apache
cp -r wordpress /var/www/html
Lastly in this step, change permissions and change file SELinux security context:
chown -R apache:apache /var/www/html/wordpress chcon -t httpd_sys_rw_content_t /var/www/html/wordpress -R
Once the configuration is completed, navigate to your website using http://<yourip>/wordpress and you should see the following installation screen.
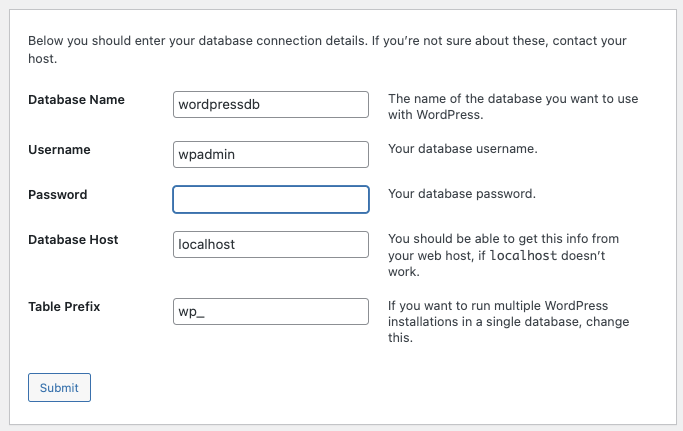
Enter the following details to configure connection to your database.
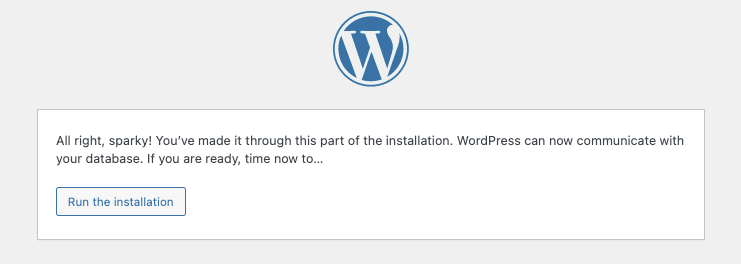
You should see the following screen. Click on Run the installation.
Enter the details for your WordPress Website. This can be changed later.
Once the installation is completed, you can login to your website using the username and password provided.
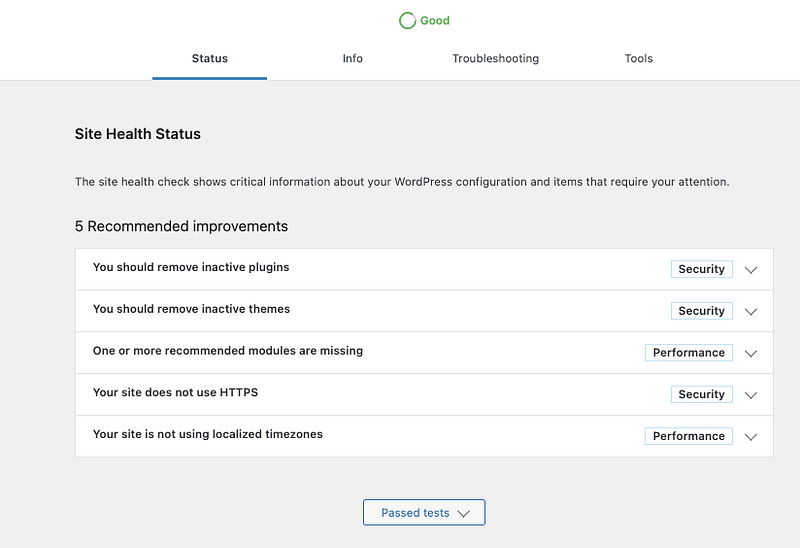
I prefer to install a few plugins that help me ensure the site is up and running and also secure.
I hope this tutorial will help you deploy WordPress on Oracle Linux on Microsoft Azure. If you find this tutorial useful, please consider buying me a coffee . This will enable me to write more useful content and keep the site running smoothly.
Originally published at https://raveegokulgaandhi.com on June 1, 2021.


